

Nodejs PayPal integration is one of the most important building blocks of your web application If you are creating an E-commerce application. In this article, we will integrate PayPal payment gateway in Nodejs step by step.
We will have a small list of products similar to Shopping cart where we will perform the PayPal payment method. Here I am using Ejs for templating and MongoDB for storing data into Database.
Below is the final outcome of the application.

1. Login Screen

2. List of products to buy
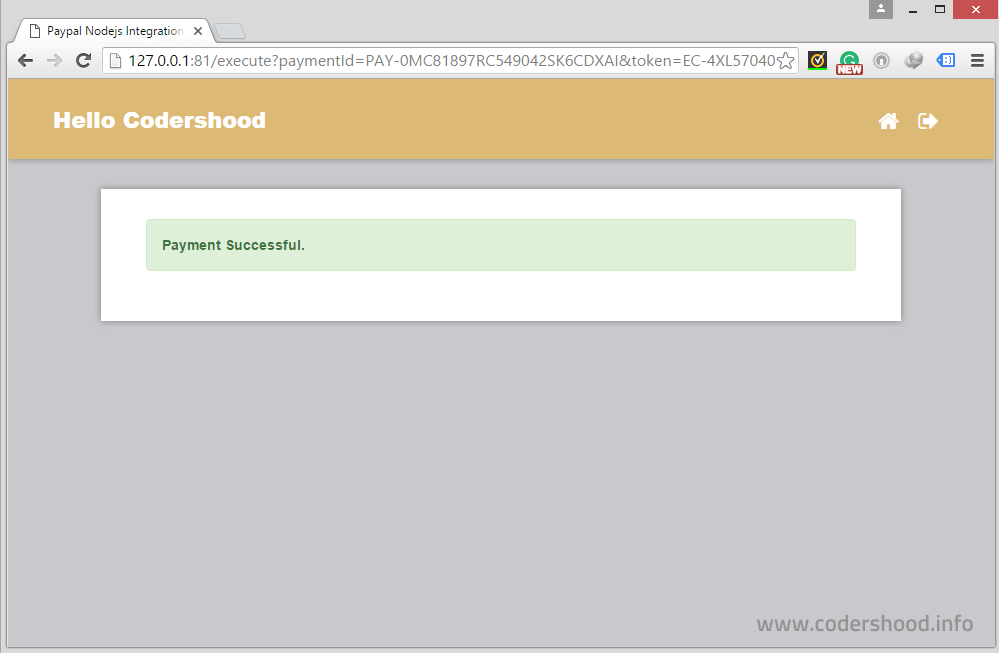
3. Payment execution page.
1. How Nodejs PayPal integration works:

The above Diagram shows the complete workflow of our application, how PayPaL Payment gateway works.
1. In step one, the application shows the list of products which are stored in Database.
2. The user selects the product and makes (creates the payment) the payment using PayPal option.
3. When users make a payment via PayPal, user we will be redirected to the Payment Cancel or Payment success URL.
4. At the server side, Server executes the created payment and gets the response of the executed payment. We have to perform a check for payment state. Successful payment indicates payment state as approved.
2. creating PayPal application ( PayPal secret & Client Id ) :
In Nodejs PayPal Integration, first you need to have PayPal application and that you can create by going into developer.paypal.com. After creating PayPal application you will get Client Id and Paypal secret, both are required in our application.
1. Login into Paypal developer account and create a new application. Give a name of your PayPal application, select the account and hit Create app button.

Creating a PayPal application
2. Now once your application is created you see your application in the list of created PayPal application as shown below.
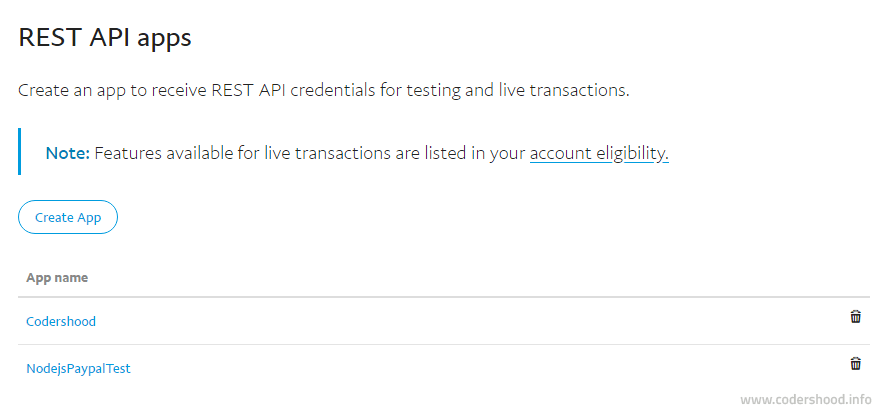 List of PayPal applications.
3. Now your application is ready, to get client Id and secret click on your created application, you should see the below image showing client Id and PayPal secret.

client Id and PayPal secret
3. PayPal Sandbox Test Account
To test your payments, PayPal provides a test environment called a sandbox. We can create and test our application before going live.
1. To get Test account credentials go to developer PayPal account and click on Accounts under Sandbox on the left panel.
2. On the right side, you can see the sandbox test account. Select buyer email and click on Profile to check your Profile.Check the below Image for more information.

Test account
3.To see the test balance Go to Funding Tab.

Test Balance
4. Creating MongoDB collections:
Here we are using MongoDB to store data in the database. Basically, we will have three collections as listed below.
1. users : As the name suggests, In this collection we will store user’s information.
users collection :
{
    "_id" : ObjectId("577af62ea8342f99d3452f81"),
    "name" : "Codershood",
    "email" : "shashank@codershood.info",
    "password" : "codershood"
}
2. products : To store different products.
products collection:
{
    "_id" : ObjectId("577af2eea8342f99d3452f7e"),
    "name" : "Google Nexus 6",
    "price" : 690.5000000000000000,
    "description" : "Android OS, v5.1.1 (Lollipop), planned upgrade to v6.0.1 (Marshmallow).1/2.4 sensor size, 1.1 µm pixel size, geo-tagging, touch focus, face detection, panorama, auto-HDR",
    "image" : "images/motox.jpg",
    "sku" : "sku-2123wers100",
    "createdAt" : ISODate("2015-02-05T01:23:42.201Z")
},
{
    "_id" : ObjectId("577af4dfa8342f99d3452f7f"),
    "name" : "Sandisk Cruzer Blade 16 GB Flash Pendrive",
    "price" : 4.50,
    "description" : "USB 2.0, 16 GB, Black & Red, Read 17.62 MB/sec, Write 4.42 MB/sec",
    "image" : "images/sandisk.jpg",
    "sku" : "sku-78955545w",
    "createdAt" : ISODate("2015-02-11T01:04:28.201Z")
},
{
    "_id" : ObjectId("577af53ba8342f99d3452f80"),
    "name" : "Prestige Pressure Cooker",
    "price" : 30.00,
    "description" : "Prestige Induction Starter Pack Deluxe Plus Pressure Cooker 5 L",
    "image" : "images/prestige.jpg",
    "sku" : "sku-90903034ll",
    "createdAt" : ISODate("2015-02-11T01:09:25.201Z")
}
3. payments : To store user’s payment for later use.
5. Folder structure and package.json:
1. Before creating a project let’s take a look at our project folder structure. We have three main folders named as utils, views, and node_modules. in our Nodejs PayPal integration application.
Folder structure:
+--- utils
|    +-- config.js
|    +-- db.js
|    +-- helper.js
|    +---routes.js
|
+--- node_modules
|    \ body-parser
|    \ ejs
|    \ express
|    \ express-session
|    \ mongodb
|    \ paypal-rest-sdk
|
+--- views
|\ css
||
|+-- bootstrap.min.css
|+-- style.css
|\ js
||
|+-- angular.min.js
|+-- script.js (Script for Login & Registration Page)
|\ pages
||
|+-- executePayement.ejs
|    +-- index.ejs
|    +-- home.ejs
|
+---server.js
+---package.json
2.To create new nodejs, the best practice is to start with npm init. This command will create a package.json file. Here is my package.json file,
package.json:
{
  "name": "Nodejs-Paypal-integration",
  "version": "0.0.1",
  "description": "Nodejs Paypal integration",
  "author": "Shashank",
  "license": "MIT",
  "dependencies": {
    "body-parser": "^1.15.2",
    "ejs": "^2.4.2",
    "express": "^4.14.0",
    "express-session": "^1.14.0",
    "mongodb": "^2.1.18"
  }
}
6. Installing Nodejs PayPal integration module
1. Paypal provides REST API SDK for Nodejs PayPal integration and we are going to use that here. To install paypal-rest-sdk, run the below command.
npm install paypal-rest-sdk
Read more aboutpaypal-rest-sdk on NPMJS.
7. Creating new Nodejs project
1. Now let’s create Nodejs PayPal integration application, we have created package.json file and we saw our folder structure. So Let’s start off by creating config.js in utils folder. This file will take of express related configuration.
config.js :
"use_strict";

/*
* Creating Nodejs PayPal Integration application
* @author Shashank Tiwari
*/
const express = require("express");
const path= require('path');

const method=config.prototype;

function config(app){

    // Set .html as the default template extension
app.set('view engine', 'ejs');

// Initialize the ejs template engine
app.engine('html', require('ejs').renderFile);

// Tell express where it can find the templates
app.set('views', (__dirname + '/../views'));

// Make the files in the public folder available to the world
app.use(express.static(path.join('publicData')));
}

method.get_config=function(){
return this;
}

module.exports = config;
5.Create a file db.jsinside utilsfolder. This file takes care of database connection.
db.js:
"use_strict";

/*
* Creating Nodejs PayPal Integration application
* @author Shashank Tiwari
*/
/*requiring mongodb node modules */const  mongodb=require('mongodb');
const MongoClient = mongodb.MongoClient;
const ObjectID = mongodb.ObjectID;
const assert = require('assert');
const MongoUrl='mongodb://localhost:27017/NodejsPaypal';

module.exports.onConnect = function(callback){
    MongoClient.connect(MongoUrl, function(err, db) {
assert.equal(null, err);
callback(db,ObjectID);
});
}
6. Now create a file called server.js.
server.js:
'use strict';

/*
* Creating Nodejs PayPal Integration application
* @author Shashank Tiwari
*/

/*requiring node modules starts */const app = require("express")();
const http = require('http').Server(app);
/*requiring node modules ends */
/* requiring config file starts*/const config =require('./utils/config.js')(app);
/* requiring config file ends*/
/* requiring config db.js file starts*/const db = require("./utils/db.js");


require('./utils/routes.js')(app);


http.listen(81,function(){
    console.log("Listening on http://127.0.0.1:81");
});
8. Creating and Executing PayPal Payment:
1.Now we have to make Payment JSON Object for our Nodejs PayPal integration. A payment is a simple JSON object as shown below:
PayPal payment:
const payment = {
    "intent": "authorize",
"payer": {
"payment_method": "paypal"
},
"redirect_urls": {
"return_url": "http://127.0.0.1:81/execute",
"cancel_url": "http://127.0.0.1:81/cancel"
},
"transactions": [{
"amount": {
"total": 90.00,
"currency": "USD"
},
"description": "PayPal payment description"
}]
};
2. create another file named as helper.js,Thisfile performs CRUD operation on the Database.
It is also responsible for performing PayPal related operation, for example creating a Payment and executing those payments.
In the below code:
isUserExists : function(data,callback){...=>This function checks, Whether users exist in Database. Expect object as the first Parameter and returns a callback.insertPayment : function(data,callback){...=> In this function we are inserting payments into the Database.getProductInfo : function(data,callback){...=> As the name suggests, We are fetching product information.getAllProducts : function(data,callback){...=> Fetching all the product for listing the Products.payNow : function(paymentData,callback){...=> This function creates a Payment.getResponse : function(data,PayerID,callback){...=>In this we are executing payment. This requires create Payment response and PayerIdand returns a callback.
Now let’s take a look a helper.js file.
helper.js:
"use_strict";

/*
* Creating Nodejs PayPal Integration application
* @author Shashank Tiwari
*/
const Mongodb = require("./db");
const paypal = require('paypal-rest-sdk');
// paypal auth configuration
var config = {
  "port" : 5000,
  "api" : {
    "host" : "api.sandbox.paypal.com",
    "port" : "",
    "client_id" : "YOUR_CLIENT_ID",  // your paypal application client id
    "client_secret" : "YOUR_CLIENT_SECRET" // your paypal application secret id
  }
}
paypal.configure(config.api);

const self={
    isUserExists:function(data,callback){
    var response={};
Mongodb.onConnect(function(db,ObjectID){
db.collection('users').findOne(data,function(err, result){
if(result != null ){
response.process = "success";
response.isUserExists = true;
response.id = result._id;
response.name = result.name;
}else{
response.process = "failed";
response.isUserExists = false;
}
callback(response);
});
});
},
insertPayment:function(data,callback){
var response={};
Mongodb.onConnect(function(db,ObjectID){
db.collection('payments').insertOne(data,function(err, result) {
if(err){
response.isPaymentAdded = false;
response.message = "Something went Wrong,try after sometime.";
}else{
response.isPaymentAdded = true;
response.id=result.ops[0]._id;
response.message = "Payment added.";
}
callback(response);
});
});
},
getProductInfo:function(data,callback){
var response={};
Mongodb.onConnect(function(db,ObjectID){
data._id = new ObjectID(data._id);
db.collection('products').findOne(data,function(err, result){

if(result != null ){
response.error = false;
response.data = result;
}else{
response.error = true;
}
callback(response);
});
});
},
getAllProducts:function(data,callback){
Mongodb.onConnect(function(db,ObjectID){
db.collection('products').find().toArray(function(err, result){
callback(result);
db.close();
});
});
},
payNow:function(paymentData,callback){
var response ={};

/* Creating Payment JSON for Paypal starts */const payment = {
"intent": "authorize",
"payer": {
"payment_method": "paypal"
},
"redirect_urls": {
"return_url": "http://127.0.0.1:81/execute",
"cancel_url": "http://127.0.0.1:81/cancel"
},
"transactions": [{
"amount": {
"total": paymentData.data.price,
"currency": "USD"
},
"description": paymentData.data.productName
}]
};
/* Creating Payment JSON for Paypal ends */
/* Creating Paypal Payment for Paypal starts */paypal.payment.create(payment, function (error, payment) {
if (error) {
console.log(error);
} else {
    if(payment.payer.payment_method === 'paypal') {
    response.paymentId = payment.id;
    var redirectUrl;
    response.payment = payment;
    for(var i=0; i < payment.links.length; i++) {
    var link = payment.links[i];
    if (link.method === 'REDIRECT') {
    redirectUrl = link.href;
    }
    }
    response.redirectUrl = redirectUrl;
    }
    }
    /*
    * Sending Back Paypal Payment response
    */    callback(error,response);
});
/* Creating Paypal Payment for Paypal ends */},
getResponse:function(data,PayerID,callback){

var response = {};

const serverAmount = parseFloat(data.paypalData.payment.transactions[0].amount.total);
const clientAmount = parseFloat(data.clientData.price);
const paymentId = data.paypalData.paymentId;
const details = {
"payer_id": PayerID
};

response.userData= {
userID : data.sessionData.userID,
name : data.sessionData.name
};

if (serverAmount !== clientAmount) {
response.error = true;
response.message = "Payment amount doesn't matched.";
callback(response);
} else{

paypal.payment.execute(paymentId, details, function (error, payment) {
if (error) {
console.log(error);
response.error = false;
response.message = "Payment Successful.";
callback(response);
} else {

/*
* inserting paypal Payment in DB
*/
const insertPayment={
    userId : data.sessionData.userID,
    paymentId : paymentId,
    createTime : payment.create_time,
    state : payment.state,
    currency : "USD",
    amount: serverAmount,
    createAt : new Date().toISOString()
}

self.insertPayment(insertPayment,function(result){

if(! result.isPaymentAdded){
response.error = true;
response.message = "Payment Successful, but not stored.";
callback(response);
}else{
response.error = false;
response.message = "Payment Successful.";
callback(response);
};
});
};
});
};
    }
}
module.exports = self;
3. Now let’s take a look at our routes for this application. Create a routes.js file in utils folder.
routes.js:
'use strict';
const bodyParser = require('body-parser');
var Session = require('express-session');

var Session = Session({
    secret:'secrettokenhere',
    saveUninitialized: true,
resave: true
});
const helper = require('./helper');

var method=routes.prototype;

function routes(app){

app.use(bodyParser.json());
app.use(bodyParser.urlencoded({
extended: true
}));
app.use(Session);
var sessionInfo;


/*
    * Rendering login page
    */app.get('/', function(req, res){
sessionInfo = req.session;
if (typeof sessionInfo.sessionData == "undefined" || sessionInfo.sessionData=="") {
res.render("index");
}else{
res.redirect("/home");
res.end();
}
});

/*
    * performing login operation
    */app.post('/login', function(req, res){
sessionInfo = req.session;

const regEx = /^(([^<>()\[\]\\.,;:\s@"]+(\.[^<>()\[\]\\.,;:\s@"]+)*)|(".+"))@((\[[0-9]{1,3}\.[0-9]{1,3}\.[0-9]{1,3}\.[0-9]{1,3}])|(([a-zA-Z\-0-9]+\.)+[a-zA-Z]{2,}))$/;
const email = req.body.email;
const password = req.body.password;

var response = {};

if(! regEx.test(email)){
response.process = false;
response.message = "Enter valid Email.";
res.writeHead(200, {'Content-Type': 'text/plain'});
res.end(JSON.stringify(result));
}else{
const data={
"email" : req.body.email,
"password" : req.body.password
}

helper.isUserExists(data,function(result){

if(result.isUserExists === true){

/*
* Storing data into Session
*/
sessionInfo.sessionData = {
userID:result.id,
name:result.name,
};
}
res.writeHead(200, {'Content-Type': 'text/plain'});
res.end(JSON.stringify(result));
});
}
});

app.get('/home',function(req, res){
sessionInfo = req.session;
if (typeof sessionInfo.sessionData == "undefined" || sessionInfo.sessionData=="") {
res.redirect("/");
res.end();
} else{
var response ={};
    const data={
_id : sessionInfo.sessionData.userID
};

/*
* Fetching products and showing onto home page
*/
helper.getAllProducts(data,function(products){
response.products = products;
response.userData = {
name : sessionInfo.sessionData.name
};
res.render('home',{
response : response
});
});
}
});

app.post('/paynow',function(req, res){
sessionInfo = req.session;
if (typeof sessionInfo.sessionData == "undefined" || sessionInfo.sessionData=="") {
res.redirect("/");
res.end();
} else{
const data ={
userID : sessionInfo.sessionData.userID,
data : req.body
}
/*
* call to paynow helper method to call paypal sdk
*/helper.payNow(data,function(error,result){
if(error){
res.writeHead(200, {'Content-Type': 'text/plain'});
res.end(JSON.stringify(error));
}else{
sessionInfo.paypalData = result;
sessionInfo.clientData = req.body;
res.redirect(result.redirectUrl);
}
});
}
});

/*
* payment success url
*/app.get('/execute',function(req, res){
sessionInfo = req.session;
var response = {};
const PayerID = req.query.PayerID;
if (typeof sessionInfo.sessionData == "undefined" || sessionInfo.sessionData=="") {
res.redirect("/");
res.end();
} else{
sessionInfo.state ="success";
helper.getResponse(sessionInfo,PayerID,function(response) {
res.render('executePayement',{
response : response
});
});
};
});

/*
* payment cancel url
*/app.get('/cancel',function(req, res){
sessionInfo = req.session;
if (typeof sessionInfo.sessionData == "undefined" || sessionInfo.sessionData=="") {
res.redirect("/");
res.end();
} else{
var response ={};
response.error = true;
response.message = "Payment unsuccessful.";
response.userData = {
name : sessionInfo.sessionData.name
};

res.render('executePayement',{
response : response
});
}
});

app.get('/logout',function(req, res){
req.session.sessionData = "";
res.redirect("/");
});


}

method.getroutes=function(){
return this;
}

module.exports = routes;
9. Creating FontEnd files :
Now we have created backend successfully now it’s time to create ForntEnd files, Here we are using EJS for templating.
I have created three files named as index.ejs, home.ejs and executePayement.ejs.
Here am not sharing the script for login and CSS files. You can find those files When you will download the code.
1. index.ejs is used for login operation.
index.ejs:
<html>
<head>
    <title>Paypal Nodejs Integration : www.codershood.info</title>
    <link rel="stylesheet" href="css/bootstrap.min.css">
    <link rel="stylesheet" href="css/font-awesome.min.css">
    <link rel="stylesheet" href="css/style.css">
</head>
<body ng-app="Login" ng-controller="LoginController" class="loginContainer">

    <div class="container">

        <div class="row">
            <h2>Login</h2>
            <label >Username:</label>
            <input type="text" class="form-control" ng-model="email" name="email" placeholder="Enter your email">
            <br/>
            <label >Password:</label>
            <input type="password" class="form-control" ng-model="password" name="password" placeholder="Enter your password">
            <br/>
            <button class="btn " ng-click="Login()">Login</button>

        </div>
    </div>
    <script src = "js/angular.min.js"></script>
    <script src = "js/script.js"></script>
</body>
</html>
2. For rendering the products so that user can them we have created home.ejs.
home.ejs:
<html>
<head>
    <title>Paypal Nodejs Integration : www.codershood.info</title>
    <link rel="stylesheet" href="css/bootstrap.min.css">
    <link rel="stylesheet" href="css/font-awesome.min.css">
    <link rel="stylesheet" href="css/style.css">
</head>
<body class="container">

    <div class="row">
        <div class="header">
            <div class="col-md-4">
                Hello <%= response.userData.name %>
            </div>
            <div class="col-md-8">
                <ul class="navigator">
                    <li>
                        <a href="/home" title="Home">
                            <i class="fa fa-home" aria-hidden="true"></i>
                        </a>
                    </li>
                    <li>
                        <a href="/logout" title="Logout">
                            <i class="fa fa-sign-out" aria-hidden="true"></i>
                        </a>
                    </li>
                </ul>
            </div>
        </div>
    </div>

    <div class="row productContainer">

            <% response.products.forEach(function(products) { %>

                <div class="col-md-12 product">
                    <div class="col-md-4">
                        <img height="200" width="150" src="<%= products.image %>">
                    </div>
                    <div class="col-md-8">
                        <div class="col-md-8">
                            <h3 class="productName"><%= products.name %></h3>
                        </div>
                        <div class="col-md-4">
                            <h3 class="productPrice"><%= products.price %> USD</h3>
                        </div>
                        <div class="col-md-12">
                            <p class="productDescription" ><%= products.description %></p>
                            <form class="form-horizontal" role="form" id="paypalForm" method="post" action="/paynow">
                                <input type="hidden" value="<%= products.price %>" name="price"/>
                                <input type="hidden" value="<%= products._id %>" name="productId"/>
                                <input type="hidden" value="<%= products.name %>" name="productName"/>
                                <button class="btn submitBtn">Buy Now</button>
                            </form>
                        </div>
                    </div>
                </div>

            <% }); %>
        </div>
</body>
</html>
3. Finally, when users return from PayPal’s site we are using executePayement.ejs to show the response as Payment successful or Payment Failed.
executePayement.ejs:
<html>
<head>
    <title>Paypal Nodejs Integration : www.codershood.info</title>
    <link rel="stylesheet" href="css/bootstrap.min.css">
    <link rel="stylesheet" href="css/font-awesome.min.css">
    <link rel="stylesheet" href="css/style.css">
</head>
<body>

    <div class="header">
        <div class="col-md-4">
            Hello <%= response.userData.name %>
        </div>
        <div class="col-md-8">
            <ul class="navigator">
                <li>
                    <a href="/home" title="Home">
                        <i class="fa fa-home" aria-hidden="true"></i>
                    </a>
                </li>
                <li>
                    <a href="/logout" title="Logout">
                        <i class="fa fa-sign-out" aria-hidden="true"></i>
                    </a>
                </li>
            </ul>

        </div>
    </div>

    <div class="container">

        <div class="row PaymentInfoCard">

            <div class="col-md-12">
                <div class="alert <% if(response.error) { %> alert-danger <% } else{ %> alert-success <% } %>">
                    <strong> <%= response.message %></strong>
                </div>
            </div>

        </div>
    </div>
</body>
</html>
I hope you are still with me because it was a very long article.
10. Final Thoughts
1.Now we have successfully created Nodejs PayPal integration application. However, our application is not yet live.To make it live read this documentation : Going Live with Your Application.
2.Unfortunately, for Indian users, INR is not in the list so here is the list of currencies PayPal is supporting. But you can use any currency calculator to get real-time INRto USD currency convert rate, for example, google currency calculator .
Let me know your thoughts in below comments box I would love to hear them and If you like this article, share with your friends.


Great how to! And it works too!
Great explanation!! Thank you. Please, could you let me know how to integrate the nodejs paypal using angular2 as frontend and explain the flow as well. Thank you
Hi Shashank,
Gettng below error. any advise ??
C:\NodeExamples\chood-payal>node app.js
internal/modules/cjs/loader.js:583
throw err;
^
Error: Cannot find module ‘C:\NodeExamples\chood-payal\app.js’
at Function.Module._resolveFilename (internal/modules/cjs/loader.js:581:15)
at Function.Module._load (internal/modules/cjs/loader.js:507:25)
at Function.Module.runMain (internal/modules/cjs/loader.js:742:12)
at startup (internal/bootstrap/node.js:283:19)
at bootstrapNodeJSCore (internal/bootstrap/node.js:743:3)
Hi Manoj,It seems
app.jsis missing.