Since now you are here and You want to implement a Real-time private chatting app using GoLang, then this article won’t disappoint you. As the title reads, Here you will get to know how you can implement real-time private chat between users who are online. This application is built using GoLang, React, and MongoDB, but you might ask how this is different from any other Group chat or just sending messages to specific users. So to convince you I have written some points below, have a look,
- First Thing first, you will implement aLoginandRegistrationin your application.
- After a Successful Login/Registration, the User will be redirected to the Home Page.
- Here You will implement a Realtime chat list, why Realtime because thechat list will update automatically whenany newuser comes onlineor anyexisting user goes offline.
- On the Home Page, Users can initiate a conversation with any other online user. Also, the user canread their old conversation.
- Once you are done talking, Then you can use the logout button to go offline.
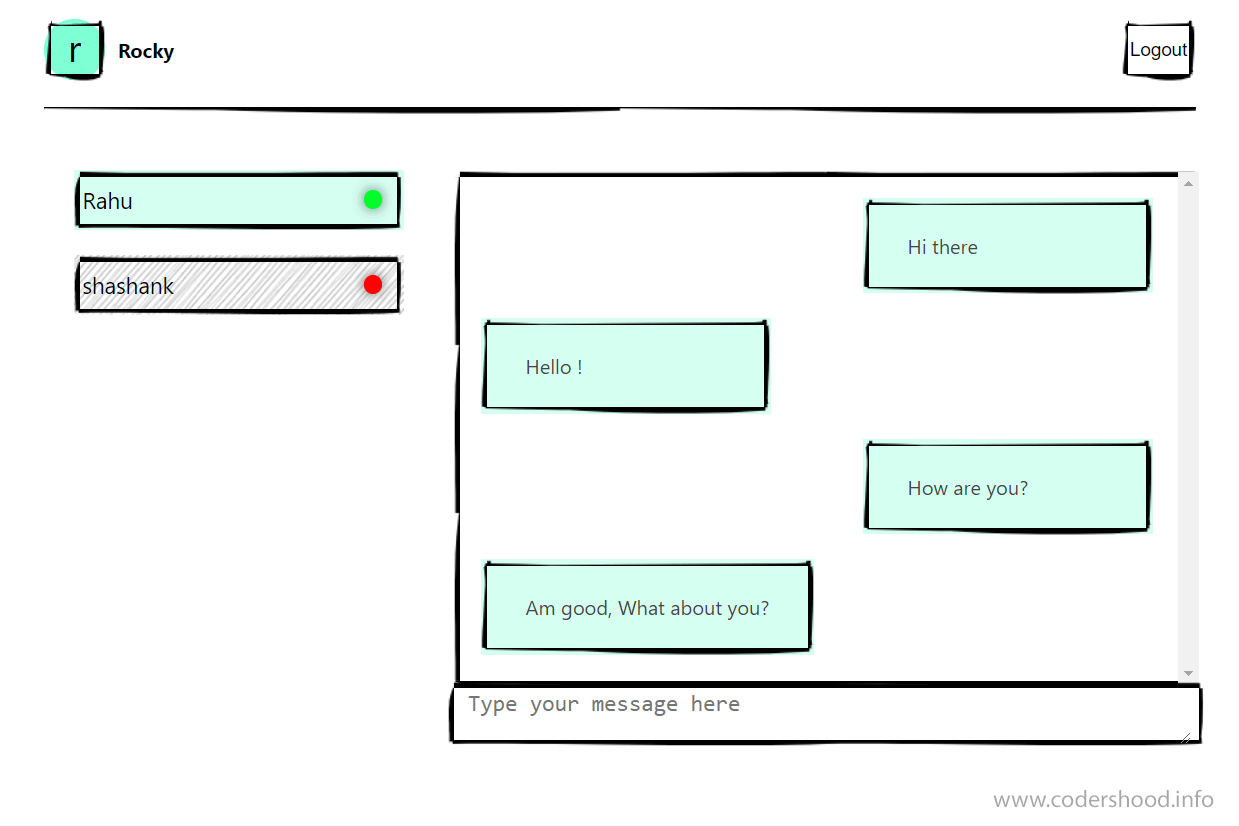
Let’s take a look at the final outcome of this application, Before going any further.

We will implement all the above-listed features in the series of Fours articles. As this article seems a little spacious, hence I have divided it into4 parts. Each part of this article covers a unique part of building the Real-Time private chatting app.
First part: Covers the prerequisites, Configuration of React application along with React routes, and GoLang server setup.
Second part: In this part, you will implement Login and Registration. With that, you will implement a feature to check the uniqueness of the username before registration and the session of a user (when the user navigates to the home page).
Third part: Here you will implement a Realtime Chat list.
Fourth part: In the last part, you will implement a chat feature, where the user actually can chat with each other.
Before we start, I want to confess that this series is going to be long, so bear with me and you might also want to go grab a Coffee, Beer or even Water will do; whatever works for you.
Creating a new React project
Let’s use create-react-app CLI to set up our application. If you don’t have create-react-app CLI installed on your machine run the below command to install it globally.npm install -g create-react-app
After create-react-app CLI installation, to create a new React project Run below command. This command will create all the necessary files, download all the required external dependencies and do all of the setup work for us.
create-react-app chatapp
Project structure and Folders
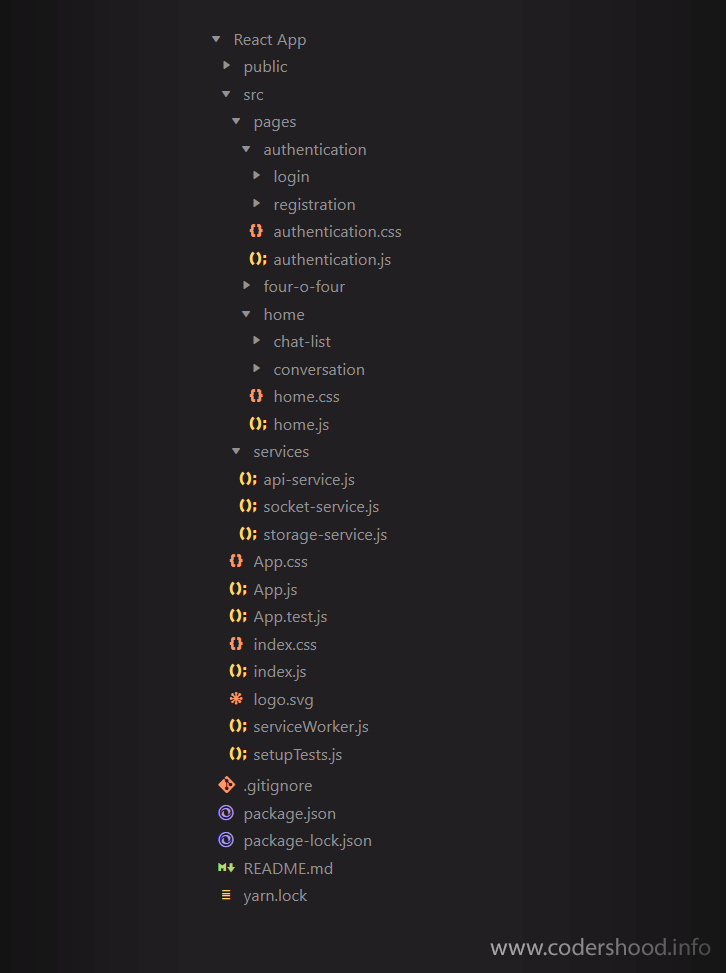
In my opinion, it is very important that you understand what folders and files you will create to in this application. You can see all the folders and files in the below image.
The below image is a snapshot React app with a few folders and files inside it. Let’s understand the motive of each file and folder.
You can create all the files are listed above or just download the code.
1./pages: You will create all the pages inside this folder. In this application, we have only two pages with a few components inside them.
Though the name of each React component is comprehensible. But still, I will list down each component along with its usage for the sake of our conscience.
Authentication Component: We will use it for Login and Registration.Chat-list Component: As the name suggests, to display the real-time Chat list.Conversation Component: This component is used to display messages.Home Component: This will be the host component of the Chat list and conversation component.NotFound Component: This component will be used when the user enters an incorrect URL, which not defined in our application.
2./services: This folder contains the two files which will be used for making an HTTP request and Socket events.
api-service.js: In this file, we will write all the HTTP requests. In this application, we will use the Fetch API to make HTTP calls.socket-service.js: Here, we will write Socket related code to receive and send real-time events.storage-service.js: This file will have all the code related to local storage, to the data in Local storage.
React Routing
In this section, we will configure our application’s routing. Here we will usereact-router-domto create React routes. Total we will have two routes/and/homeroute.
=>When this application loads in the browser, we will redirect the user to/route. This route will display the Authentication page which is nothing butAuthenticationcomponent.
=>Now theApp.jsfile and write down the below code,
App.js:
import React from 'react';
import './App.css';


import {
  BrowserRouter as Router,
  Route,
  Switch
} from "react-router-dom";

import Authentication from './pages/authentication/authentication';
import Home from './pages/home/home';
import FourOFour from './pages/four-o-four/four-o-four';


function App() {
  return (
     <Router>
        <Switch>
          <Route path="/" exact component={Authentication} />
          <Route path="/home/" component={Home} />
          <Route component={FourOFour} />
        </Switch>
      </Router>
  );
}

export default App;
Creating New GoLang Project and Application Folder structure
Till now you created and completed the React application setup. As of now, your React application is nothing a but clean slate, and you will write the rest of the A B C D in the next 3 parts of the series.
In this section, you will create a GoLang API boilerplate. For those who don’t know why GoLang server is required to us,
- First, you will need a server where you can store and fetch the user’s data and messages.
- Second, you need to implement real-time messaging for that we need a Web Socket.
- Third, Because we are Gophers! Am just kidding.
Okay so let’s go ahead and start the development, but before that let’s take a look at our folder structure of the GoLang server.

=>Let’s start off by creating a new GoLang project by using go mod init private-chat command. This command will initialize a new module in the current directory.
=>Also, if you notice the above command will create a new mod file named as go.mod in the current directory.
=>In this file you will have all your package listed, for now, this is how my mod file looks like,
go.mod:
module private-chat

go 1.13

require (
    github.com/google/go-querystring v1.0.0 // indirect
    github.com/google/uuid v1.1.1
    github.com/gorilla/handlers v1.4.2
    github.com/gorilla/mux v1.7.4
    github.com/gorilla/websocket v1.4.2
    github.com/joho/godotenv v1.3.0
    github.com/rs/cors v1.7.0
    go.mongodb.org/mongo-driver v1.3.3
    golang.org/x/crypto v0.0.0-20200510223506-06a226fb4e37
)
Creating a GoLang Server
Create aserver.goin the root of the project, which will be our entry point for the project. Here we will make a connection with the MongoDB database and we will define our application routes.
=>Inside themain()function, First we are loading environment variables and then printing some information.
=>In the next line, we will call a function to connect the database and then we createroutevariable, which will hold Route instance.
=>ThenAddApproutes()function register application routes.
=>And at the end, usinghttp.ListenAndServe()we will start our GO server.
server.go:
package main

import (
    "fmt"
    "net/http"
    "os"

    "github.com/gorilla/mux"
    "github.com/joho/godotenv"

    config "private-chat/config"
    utils "private-chat/utils"
)

func main() {

    godotenv.Load()

    fmt.Println(
        fmt.Sprintf("%s%s%s%s", "Server will start at http://", os.Getenv("HOST"), ":", os.Getenv("PORT")),
    )

    config.ConnectDatabase()

    route := mux.NewRouter()

    AddApproutes(route)

    serverPath := ":" + os.Getenv("PORT")

    cors := utils.GetCorsConfig()

    http.ListenAndServe(serverPath, cors.Handler(route))
}
Connecting with database (MongoDB)
Create adb.gofile under /config folder and write down the below code. Here I am using MongoDB as a database. Here it is entirely up to you, which database you want to use, but for this article, we will use MongoDB.
db.go:
package config

import (
    "context"
    "log"
    "os"

    "go.mongodb.org/mongo-driver/mongo"
    "go.mongodb.org/mongo-driver/mongo/options"
)

// MongoDBClient is exported Mongo Database client
var MongoDBClient *mongo.Client

// ConnectDatabase is used to connect the MongoDB database
func ConnectDatabase() {
    log.Println("Database connecting...")
    // Set client options
    clientOptions := options.Client().ApplyURI(os.Getenv("DB_URL"))

    // Connect to MongoDB
    client, err := mongo.Connect(context.TODO(), clientOptions)
    MongoDBClient = client
    if err != nil {
        log.Fatal(err)
    }

    // Check the connection
    err = MongoDBClient.Ping(context.TODO(), nil)

    if err != nil {
        log.Fatal(err)
    }

    log.Println("Database Connected.")
}
Setting up the CORS and Password encryption/decryption
In this section, We will setup the CORS for the GoLang server and we will write a code to encrypt and decrypt the password provided by the user when doing login and registration.
=> Adding a CORS feature to the GoLang Server is necessary otherwise your React application will find difficulties to make API calls to GoLang Server.
=> Here we are using thiscors package to implements the CORS functionality, the code is very short and easy to understand.
=> The function is called from the server.go file. Create a file named as cors.go in /utils folder and write the code,
utils/cors.go:
package utils

import (
    "github.com/rs/cors"
)

// GetCorsConfig will return the CORS values
func GetCorsConfig() *cors.Cors {
    return cors.New(cors.Options{
        AllowedOrigins: []string{"*"},                                       // All origins
        AllowedMethods: []string{"GET", "POST", "OPTIONS", "DELETE", "PUT"},
    })
}
Next is to create the file to encrypt and decrypt the password provided the user when doing login and registration.
=> Here we will bcrypt package for encryption and decryption, this will be used later in the series where we will write the code for Login and Registration.
=>Create a file named as password-hash.go in /utils folder and write the code,
utils/password-hash.go:
package utils

import (
    "errors"

    "golang.org/x/crypto/bcrypt"
)

// CreatePassword will create password using bcrypt
func CreatePassword(passwordString string) (string, error) {
    hashedPassword, err := bcrypt.GenerateFromPassword([]byte(passwordString), 8)
    if err != nil {
        return "", errors.New("Error occurred while creating a Hash")
    }

    return string(hashedPassword), nil
}

// ComparePasswords will create password using bcrypt
func ComparePasswords(password string, hashedPassword string) error {
    err := bcrypt.CompareHashAndPassword([]byte(hashedPassword), []byte(password))
    if err != nil {
        return errors.New("The '" + password + "' and '" + hashedPassword + "' strings don't match")
    }
    return nil
}
Conclusion
So here we are at the end of the first part. Before jumping to the next part of the article, let’s encore all the steps one more time.
- We created the React application, did all required setup, and understood it’s folder structure.
- Second, we created a new GoLang application and did the configuration.
- Also, we created a GoLang server and connected our application to MongoDB.
In the next part, you will implement Login, Registration, and Logout feature along with other required features. I’ll see you in the next part.