Showing loading state/screen on the webpage is one the most important thing. A lot of people do this in their own way, but to truly stand out from the crowd and to show the loading state professionally; you must do handle this state very gracefully. This article I will show you, how you can show a better loading screen in React using Suspense and SuspenseList.
Caution:
Suspense and SuspenseList is an experimental feature of the react, they are not yet shipped in the stable version of React
The problem: inconsistent loading of components
Let’s first discuss the problem of showing a loading screen. Most of the time as a frontend developer you develop screens that consume the Web APIs and you can never predict how much time it will take to API to get a response from the server. While API is fetching the data from the server, you can display some sort of the loader or a text that indicates API is still fetching the data.
And this becomes extremely critical to handle when you have a lot of elements in your page but when you have fewer elements, say one or maximum two elements on the screen which is dependent API calls, things become easy to handle.
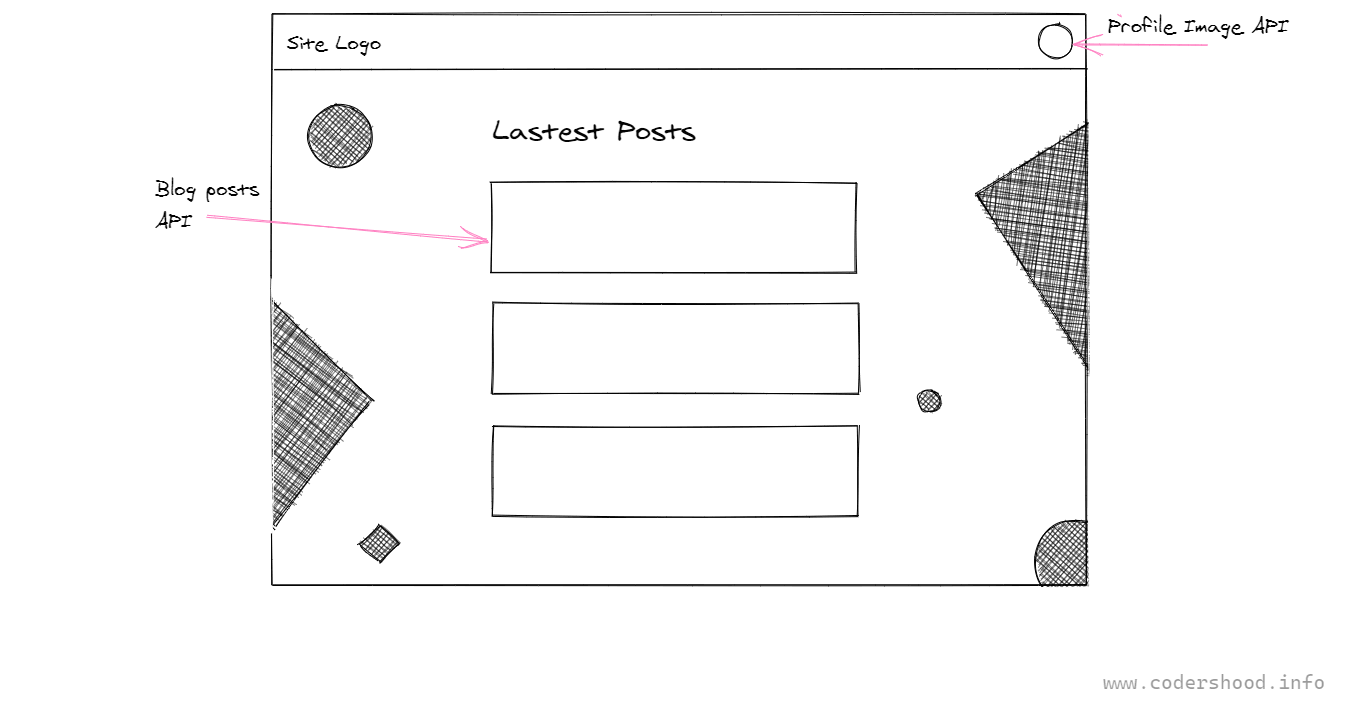
For example, look at the below image, there we have only two elements that consume the API calls and rest are the just elements to decorate the page. Here showing a Loading screen doesn’t seem so difficult, for example, you can just pull two loaders on the page. One loader at the profile image and the second one in the in middle on the page.
But the situation will completely change when you will have multiple elements on the page. The best example can be the Dashboard of any application where you might have multiple graphs and tables or for example, you can consider Facebook’s feed page. In those kinds of pages, you will have multiple elements that will consume different APIs, so in that case, showing proper loader along with the proper sequence becomes a challenging task.

For example, take a look at the above image of a simple Dashboard. This page is still loading the content but not in any particular order, which is not pleasing to the user’s eye and looks very unprofessional. But We can handle this problem very easily in react which we look into the next section.
The Solution: use Suspense and SuspenseList
React is now offering two new built components, by using those components, we can load our contents very smoothly and professionally. For example, let a look at the below image of the dashboard, it loads content in the proper sequence.
 =>If you look at the above image closely, you will find the first we load the header section will contain the Profile image. This section is represented in Aqua color.
=>Then we load the second section(Pink color) which contains the Graphs and Tables. We load this section just after the loading of the first section completes i.e Header.
=> Lastly, we load the last Section which contains the list of Hotels. This section is displayed at the very end.
Now, this is managed by the entirely React’s inbuilt components Suspense and SuspenseList. All you have to do is write Suspense Components in proper order inside the SuspenseList Component.
By loading this way we can create and deliver a professional and clean application. We will see the implementation of Suspense and SuspenseList component next section.
The Code: Creating a new React project
Now it’s time to get our hands dirty and implement loading screen in React using Suspense and SuspenseList. Let’s use create-react-app CLI to set up our application. If you don’t have create-react-app CLI installed on your machine run the below command to install it globally.npm install -g create-react-app
After create-react-app CLI installation, to create a new React project Run below command. This command will create all the necessary files, download all the required external dependencies and do all of the setup work for us.
create-react-app chatapp
But note that, we are going to use the experimental React. In react world, its called as Adopting Concurrent Mode. Now to install the experimental React tun the below command,
npm install react@experimental react-dom@experimental
Project structure and Folders
In my opinion, it is very important that you understand what folders and files you will create to in this application. You can see all the folders and files in the below image.
The above Image is a snapshot/srcfolder with few folders and files inside it. We have created a few folders, let’s understand the motive of each file and folder.

=>You can create all the files are listed above or just download the code.
=> I have created three components here Content, Header and Sidebar. The purpose of Header component self-explanatory, I won’t get in the nitty-gritty of component.
=>One thing, I would like to mention here, that each component has its own loading Component to indicate that the data is being loaded from the server.
Fetching data from the server in react application
In the below code, I have written a function to read the response from the APIs. Once these function completes API calls then they will be consumed inside the respective components.
Here I have used Javascript’s fetch API instead of axios to avoid the bloating of code. Also, we won’t pay attention to the API code, since that is not that interesting part here.
api.js:
function fetchUserDetails() {
    return new Promise((resolve, reject) => {
        fetch("https://demo.codershood.info/react-better-loading/api/api.php?type=user_details")
            .then(response => {
                return response.json();
            })
            .then(data => {
             resolve(data);
            })
            .catch(error => {
                reject(null);
            });
    });
}

function fetchPostDetails() {
    return new Promise((resolve, reject) => {
        fetch("https://demo.codershood.info/react-better-loading/api/api.php?type=post_details")
            .then(response => {
                return response.json();
            })
            .then(data => {
             resolve(data);
            })
            .catch(error => {
                reject(null);
            });
    });
}

function fetchAuthors() {
    return new Promise((resolve, reject) => {
        fetch("https://demo.codershood.info/react-better-loading/api/api.php?type=authors")
            .then(response => {
                return response.json();
            })
            .then(data => {
                resolve(data);
            })
            .catch(error => {
                reject(null);
            });
    });
}

export function fetchAppData() {
    const userPromise = fetchUserDetails();
    const postDetailsPromise = fetchPostDetails();
    const authorsPromise = fetchAuthors();
    return {
        userDetails: wrapPromise(userPromise),
        postDetails: wrapPromise(postDetailsPromise),
        authors: wrapPromise(authorsPromise)
    };
}

function wrapPromise(promise) {
    let status = 'pending';
    let result;
    let suspender = promise.then(
        r => {
            status = 'success';
            result = r;
        },
        e => {
            status = 'error';
            result = e;
        }
    );
    return {
        read() {
            if (status === 'pending') {
                throw suspender;
            } else if (status === 'error') {
                throw result;
            } else if (status === 'success') {
                return result;
            }
        }
    };
}
Explanation:
- The functions
fetchUserDetails(),fetchPostDetails()andfetchAuthors()uses Fetch API to call the APIs from the server. - The function
fetchAppData()wraps all the above function’s response in one single Object. - The
wrapPromise()wraps the promise into Promise suspender. Basically whenever the read function will be called it will return three resultsPromise Object,ErrorandResultbased on the status of the Promise.
Implementing loading screen in React using Suspense and SuspenseList
In this section, we will use Suspense and SuspenseList to show a loading screen. Here we will display the Header, Sidebar and Content using the components which I have created. Open the App.js and write down the below code,
App.js:
import React, { Suspense, SuspenseList } from "react";

import Header from './components/Header';
import HeaderLoader from './components/Header/loader';
import Sidebar from './components/Sidebar';
import SidebarLoader from './components/Sidebar/loader';
import Content from './components/Content';
import ContentLoader from './components/Content/loader';

import { fetchAppData } from './services/Api';

import './App.css';

const resources = fetchAppData();

function App() {
  return (
    <div className="app__main-container">
      <SuspenseList revealOrder="together">
        <Suspense fallback={ <HeaderLoader />} >
          <Header resources={resources} />
        </Suspense>
        <div className="app__main-content">
          <Suspense fallback={ <SidebarLoader />} >
            <Sidebar resources={resources} />
          </Suspense>
          <Suspense fallback={ <ContentLoader />} >
            <Content resources={resources} />
          </Suspense>
        </div>
      </SuspenseList>
    </div>
  );
}

export default App;
Explanation:
- First, we have imported Suspense and SuspenseList from React.
- Then we have imported our Components and their corresponding Loaders from
/componentsfolder. - Then we call
fetchAppData()function, which returns the response from API. - Lastly, we have written all our components in inside the
SuspenseComponent and allSuspensecomponents are inside theSuspenseList. - In
SuspenseList, we passrevealOrderprop, which defines the behavior of the components.
Conclusion
In this article, we understood how we can show a better loading screen in React using Suspense and SuspenseList. Though this is an experimental feature of the react, but be sure this is something that going to come in the coming version of React. So might wanna give it a try and see how you can use it in your projects.
For now, that’s it, feel free to share your opinions in the below comments box and if you like this article do share with your friends and colleagues.