Registering users from the Third Party Websites are not new, and that’s why you are here. People are doing this for a long time, and it’s good that you get already validated user. This article explains Facebook Login in GoLang Tutorial, where you will implement Login with Facebook in GoLang. I have tried my best to write the code in a very simple way and things will be easy to understand, let’s start.
Now first we have to create an application in the developer dashboard for Facebook. Using the application that you created in your Facebook developer Dashboard, we will implement the Facebook Login. This part will be covered in the next section. And just in case if you know all this then you can download the code by clicking below Download Button and start working.
1. Creating an application in Facebook Developer Dashboard
First, you have to create an application In Facebook Developer Dashboard, and you do that by visiting the developer Dashboard. Follow the below steps to know how to create an application in Facebook developer Dashboard. The first thing you going to need is AppID and AppSecret from Facebook App ID, but for that, you will have to create a Facebook application, let’s do that in this section.
1. Create Facebook APP ID
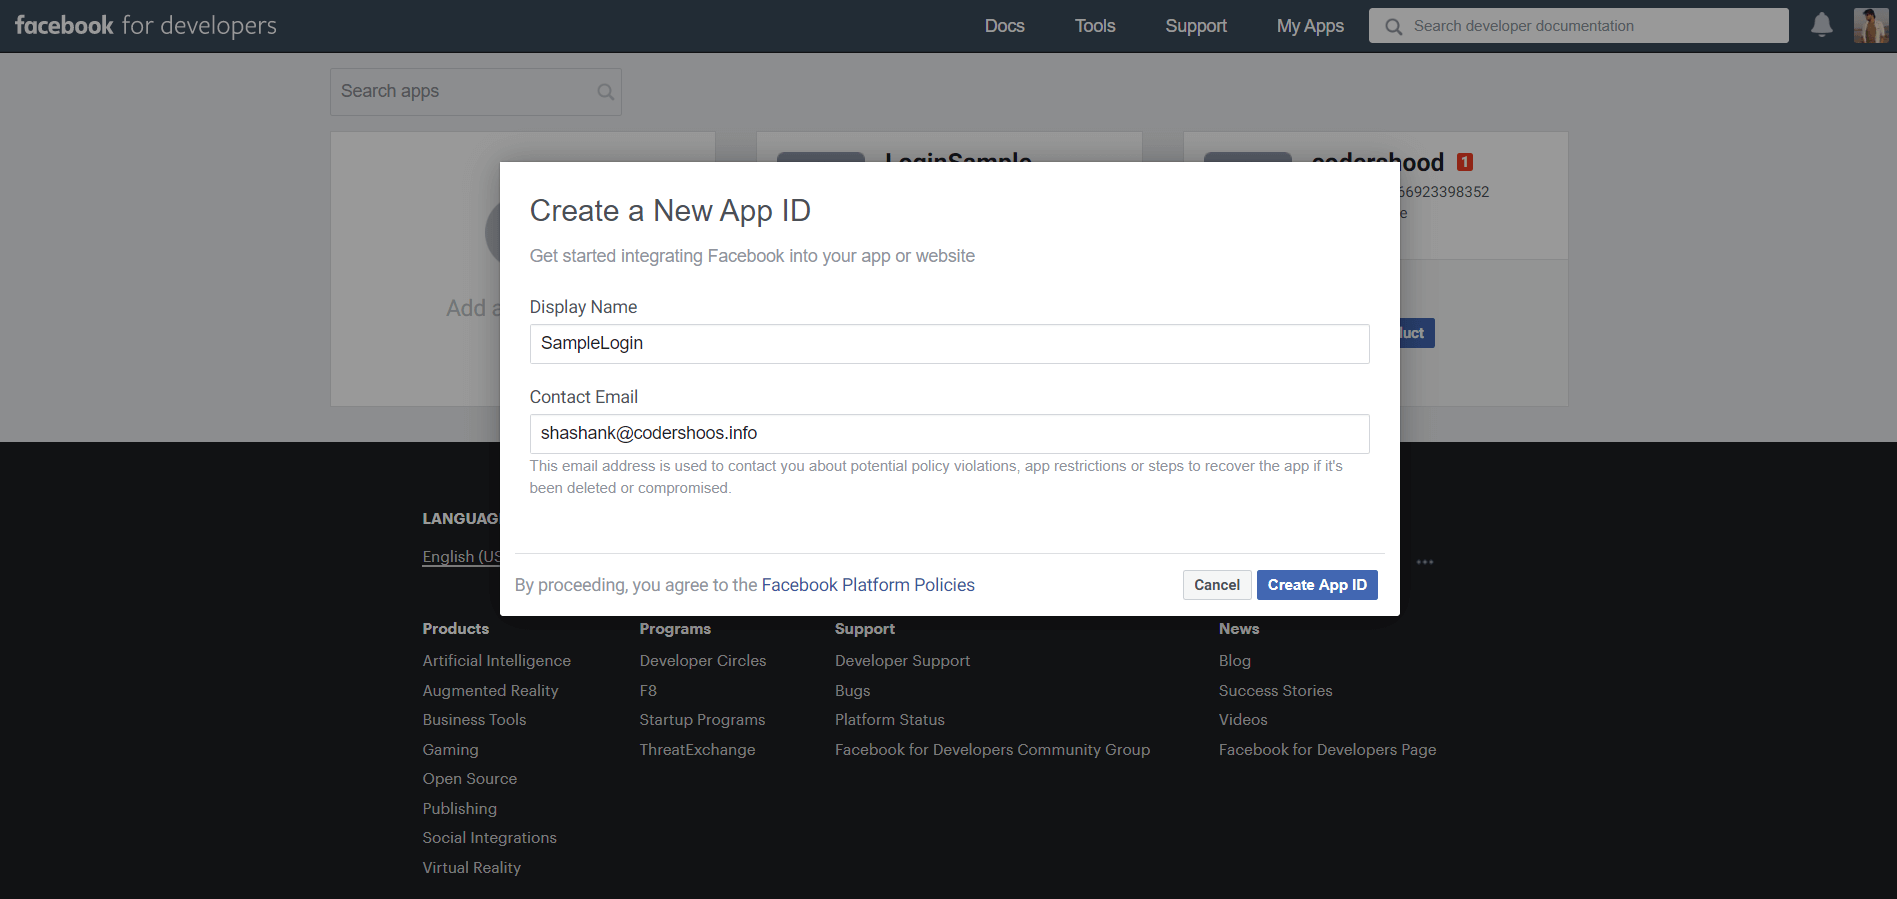
The first step is to create a Facebook Application ID in the Developer Dashboard. Have a look at the below screenshot, you should also get the similar POPUP to fill the Name of the APP ID and your email.
 2. Select Facebook Login Product
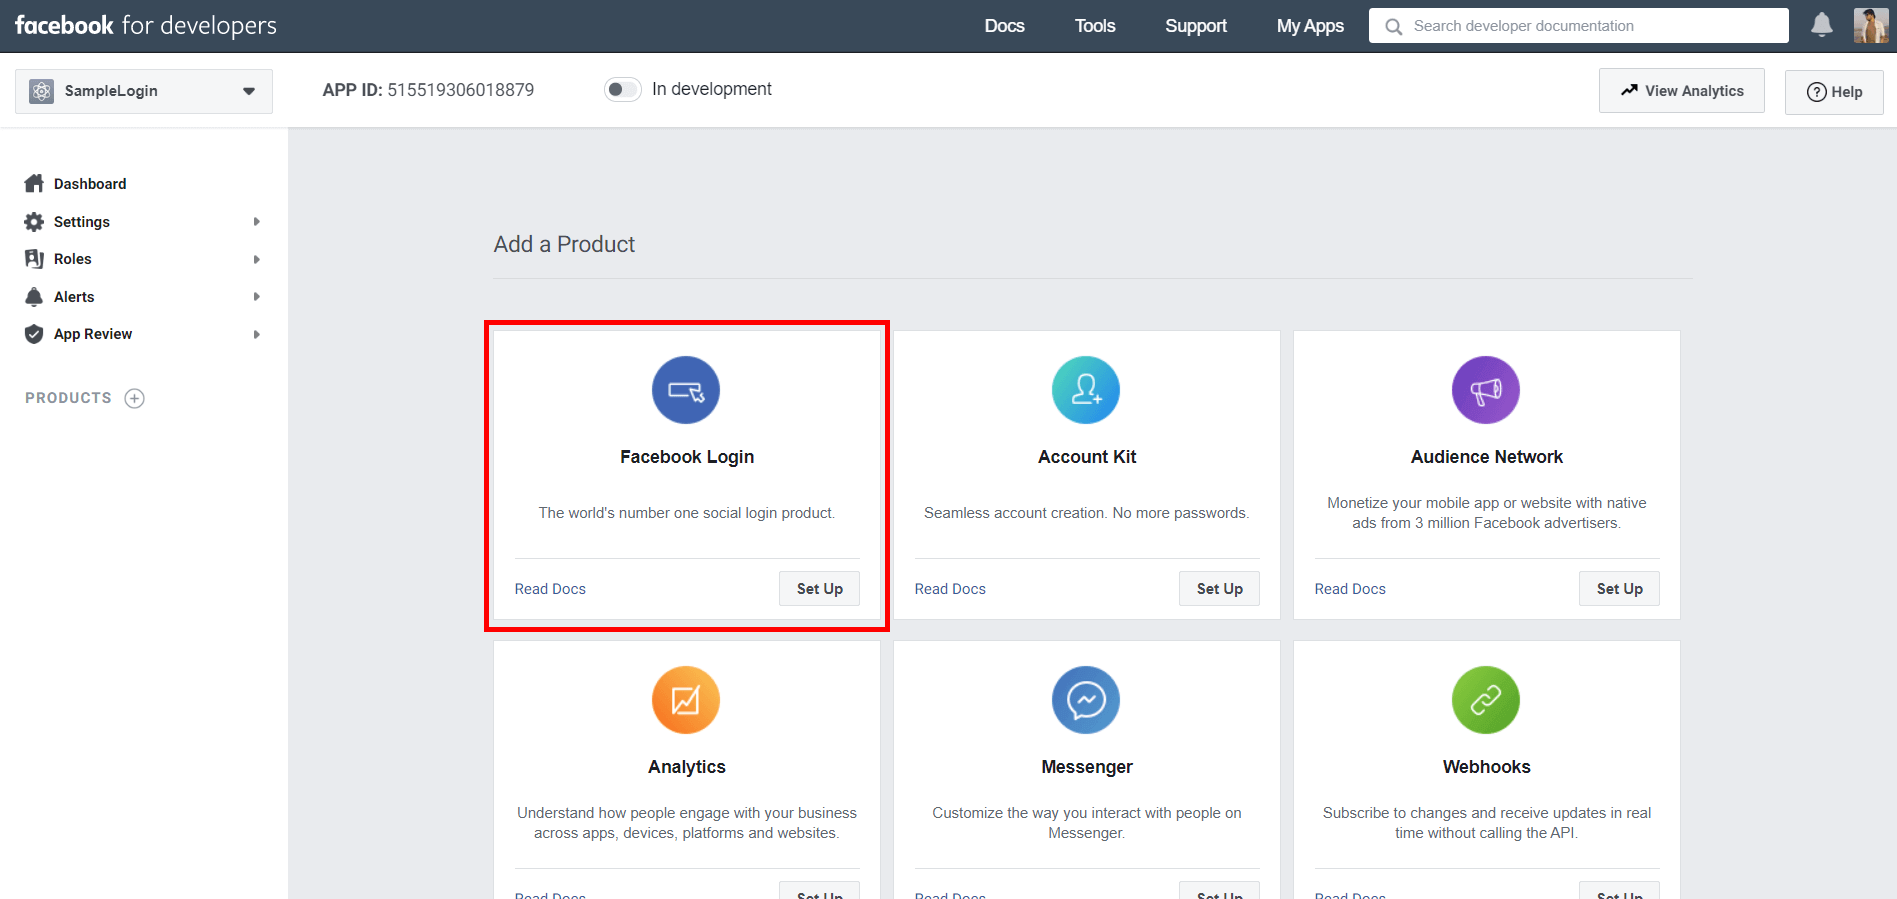
Once you will submit the form you will be asked to select Facebook Product. Here you have to select the Login Product as shown in the below screen,
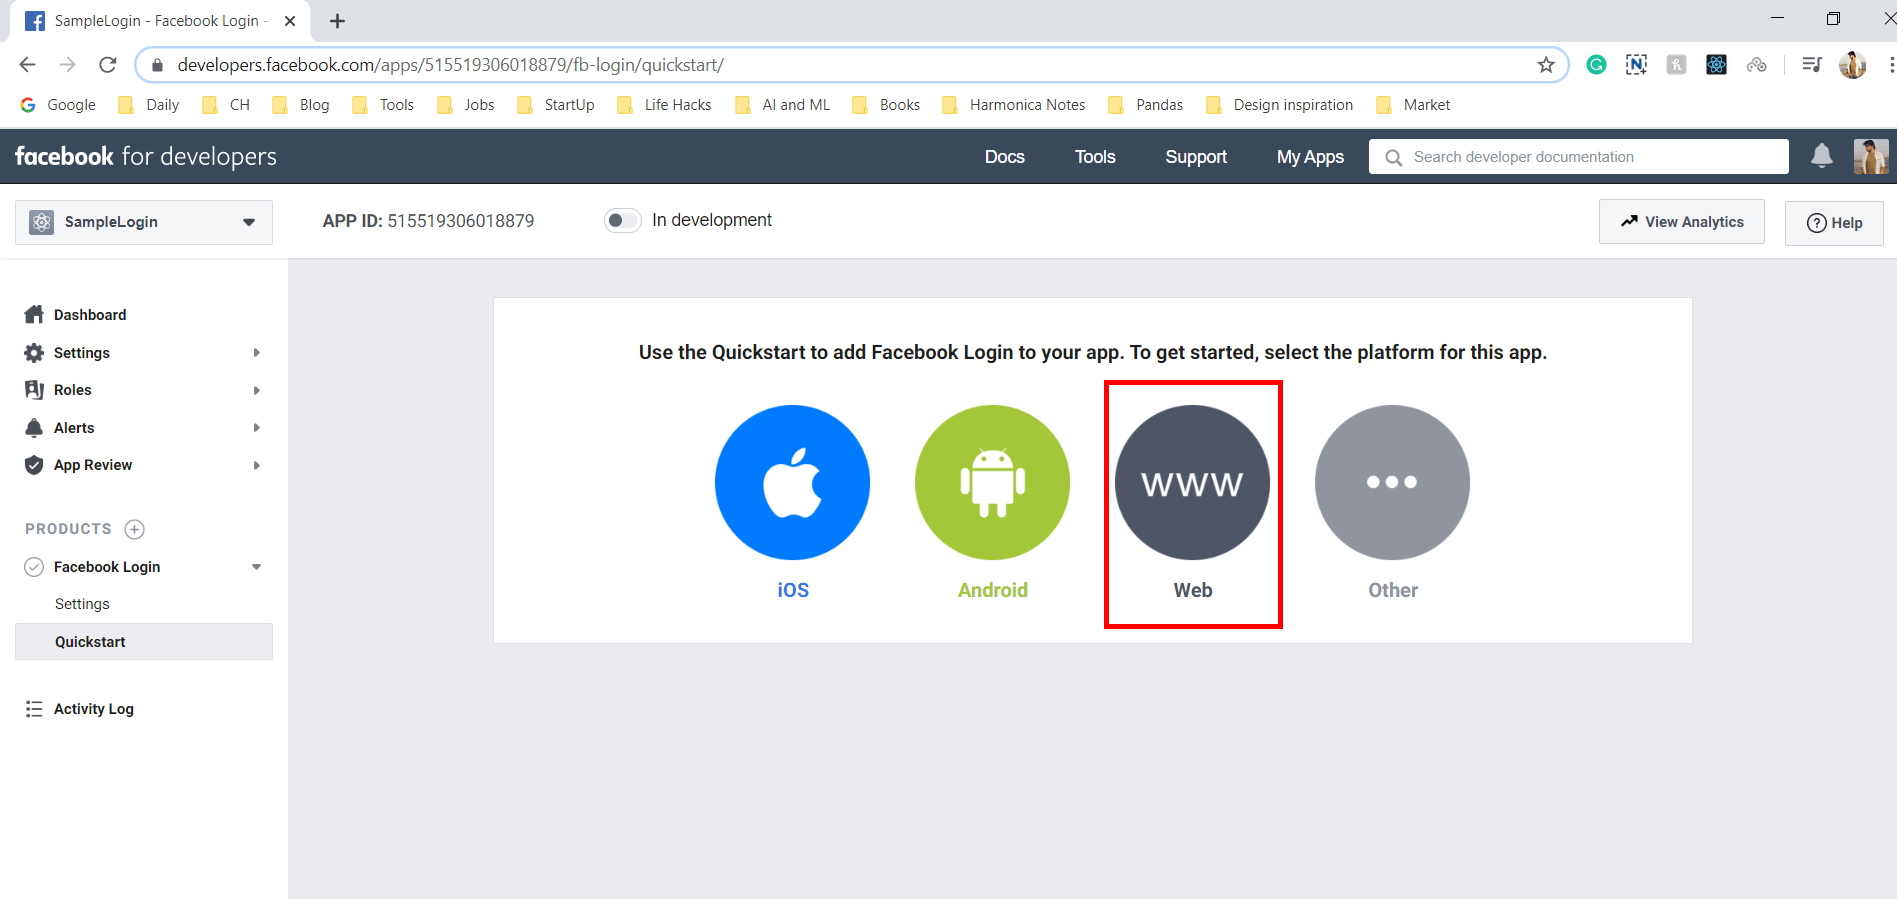
3. Select the application Platform
In this step, you will be asked to set the platform on which you intend to use this application. So here we are creating Web Server in GoLang, hence we will select the WEB(WWW) as shown in the below image,
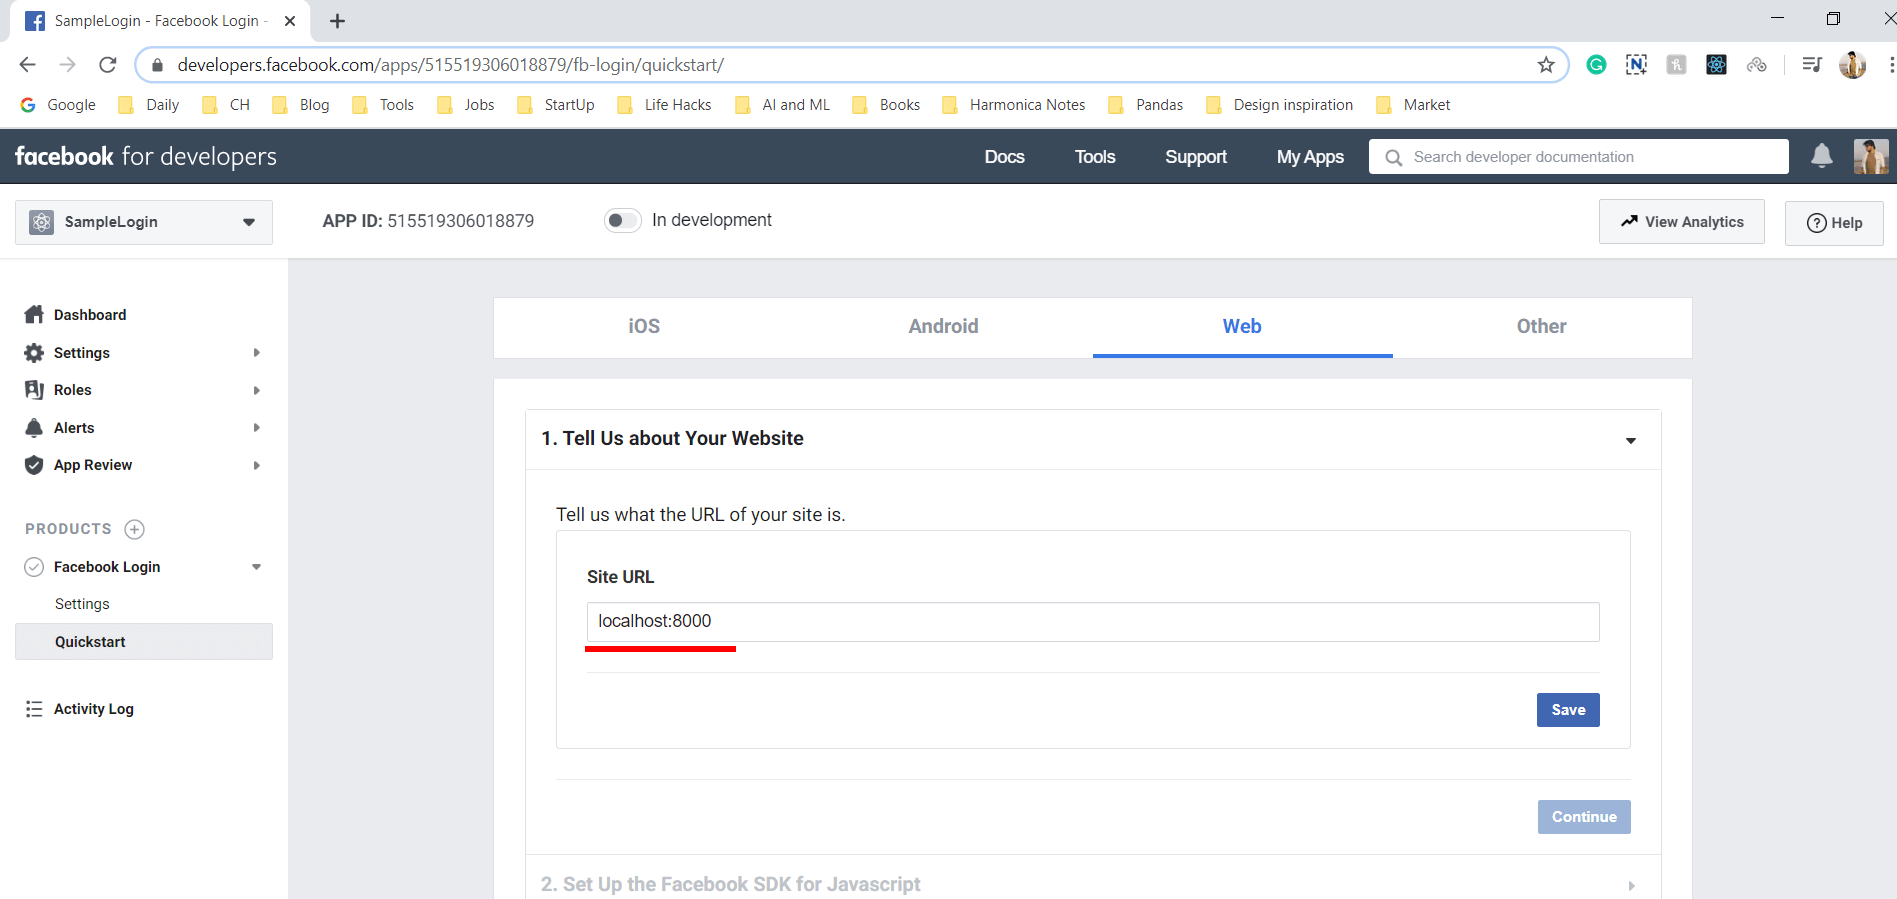
4. Enter the website URL
This the last step, where you will have to enter the Website address. In our case, we are first implementing this web server on Localhost, so we will enter localhost:8000 as shown in the below image. Later you can change it to your actual URL.
Now you are done with the Facebook app ID setup. Let’s go ahead and create our App using GoLang.
3. Prerequisites
Here we will be using JSON web Token, and when you create an API then managing the session using JWT is the best option. I have written already written a good post on implementing JWT authentication in GoLang Tutorial with Example API, I urge you to have a look and then come back.
Also, In this application, we will use the oAuth2 package to implement Facebook Login in GoLang. You can install it by running the below command,
go get golang.org/x/oauth2
4. Understanding the project structure
Here we will give a very little bit of styling to our web application just to make it look presentable. And we won’t be using any frontend libraries or frameworks, for the sake of simplicity.
Since we are using plain Javascript and there is not much on the client-side to understand, hence we will focus on the Backend part only. Inside theviewsfolder, we will write down the MARKUP.

Apart from the public folder we have only go files, let’s understand the purpose of each file why we need them.
db.go:The file will have code to connect the Redis database.
routes-handlers.go:This file will have the actual logic of the application. Here we will write code to store the Hash Key with the actual URL and the Redirection Logic will be handled here only.
routes.go:As the name suggests, this file will contain the endpoints that we will define in this application.
server.go:To create the Golang server we will use server.go file.
facebook.go:This will have all functions and config related to Facebook inside it.
jwt.go:This file contains the code related to only JWT, such as creating a JWT token and verifying the JWT tokens.
structs.go:All thestructsused in this application will go under this file.
5. Creating a GoLang Server
Create a server.go in the root of the project, which will be our entry point for the project. Here we will make a connection with the MongoDB database and we will define our application routes.
=>Inside themain()function, First we are printing some information.
=>Then usingConnectDatabse()function, we will make a MongoDB connection.
=>In the next line, we will createroutevariable, which will hold Route instance.
=>ThenAddApproutes()function register application routes.
=>And at the end, usinghttp.ListenAndServe()we will start our GO server.
server.go:
package main

import (
    "log"
    "net/http"

    "github.com/gorilla/mux"
    "github.com/joho/godotenv"
)

func main() {

    godotenv.Load()

    log.Println("Server will start at http://localhost:8000/")

    ConnectDatabase()

    route := mux.NewRouter()

    AddApproutes(route)

    log.Fatal(http.ListenAndServe(":8000", route))
}
6. Connecting GoLang to MongoDB
Create adb.goin the root of the project, Here we will connect our GoLang app with MongoDB database.
=>In the below code, first we have to include the MongoDB Go driver i.e.go-mongodb-driver.
=>Then we have created variableClient, which will hold the MongoDB connection instance. ThisClientvariable will be available inside all the files under themainpackage.
=>Inside theConnectDatabse()function we will create MongoDB connection as shown below,
db.go:
package main

import (
    "context"
    "log"

    "go.mongodb.org/mongo-driver/mongo"
    "go.mongodb.org/mongo-driver/mongo/options"
)

// Client is exported Mongo Database client
var Client *mongo.Client

// ConnectDatabase is used to connect the MongoDB database
func ConnectDatabase() {
    log.Println("Database connecting...")
    // Set client options
    clientOptions := options.Client().ApplyURI("mongodb://localhost:27017")

    // Connect to MongoDB
    client, err := mongo.Connect(context.TODO(), clientOptions)
    Client = client
    if err != nil {
        log.Fatal(err)
    }

    // Check the connection
    err = Client.Ping(context.TODO(), nil)

    if err != nil {
        log.Fatal(err)
    }

    log.Println("Database Connected.")
}
7. Adding GoLang Structs
Create astructs.goin the root of the project, Here we will register all structs used in this application. The reason for creating a separate file is that your code will look more clear and it will become very easy to read.
structs.go:
package main

import jwt "github.com/dgrijalva/jwt-go"

// ErrorResponse is struct for sending error message with code.
type ErrorResponse struct {
    Code    int
    Message string
}

// SuccessResponse is struct for sending error message with code.
type SuccessResponse struct {
    Code     int
    Message  string
    Response interface{}
}

// Claims is  a struct that will be encoded to a JWT.
// jwt.StandardClaims is an embedded type to provide expiry time
type Claims struct {
    Email string
    jwt.StandardClaims
}

// UserDetails is struct used for user details
type UserDetails struct {
    Name     string
    Email    string
    Password string
}

// FacebookUserDetails is struct used for user details
type FacebookUserDetails struct {
    ID    string
    Name  string
    Email string
}
8. Creating and Verifying JWT token
Now let’s write code for creating and verifying the JWT token. In this application, we will use the dgrijalva/jwt-golibrary for implementing and verifying the JWT token. In this file we will have two methods, the first method will create a JWT token and the second method will verify the token.
=>TheCreateJWT()function will create a JWT token and theVerifyToken()function will verify the token. For more explanations of the code and how it works visit this post.
=>Createjwt.gofile and copy-paste the below code,
jwt.go:
package main

import (
    "time"

    "github.com/dgrijalva/jwt-go"
)

var jwtSecretKey = []byte("jwt_secret_key")

// CreateJWT func will used to create the JWT while signing in and signing out
func CreateJWT(email string) (response string, err error) {
    expirationTime := time.Now().Add(5 * time.Minute)
    claims := &Claims{
        Email: email,
        StandardClaims: jwt.StandardClaims{
            ExpiresAt: expirationTime.Unix(),
        },
    }

    token := jwt.NewWithClaims(jwt.SigningMethodHS256, claims)
    tokenString, err := token.SignedString(jwtSecretKey)
    if err == nil {
        return tokenString, nil
    }
    return "", err
}

// VerifyToken func will used to Verify the JWT Token while using APIS
func VerifyToken(tokenString string) (email string, err error) {
    claims := &Claims{}

    token, err := jwt.ParseWithClaims(tokenString, claims, func(token *jwt.Token) (interface{}, error) {
        return jwtSecretKey, nil
    })

    if token != nil {
        return claims.Email, nil
    }
    return "", err
}
9. Setting Up the Facebook config
Now you know that we will be using GoLang’s Oauth package, and it requires come configuration before we can use that. For example, first, you have to provide the Client ID and Client Secret, which you will get from the Facebook Developer Dashboard.
=> The below code will return the Facebook OAuth Configurations, random state string and the Users details fetched using Facebook API.
=> Create a facebook.go file and write below code,
facebook.go:
package main

import (
    "encoding/json"
    "errors"
    "net/http"
    "os"

    "golang.org/x/oauth2"
    facebookOAuth "golang.org/x/oauth2/facebook"
)

// GetFacebookOAuthConfig will return the config to call facebook Login
func GetFacebookOAuthConfig() *oauth2.Config {
    return &oauth2.Config{
        ClientID:     os.Getenv("CLIENT_ID"),
        ClientSecret: os.Getenv("CLIENT_SECRET"),
        RedirectURL:  os.Getenv("FACEBOOK_REDIRECT_URL"),
        Endpoint:     facebookOAuth.Endpoint,
        Scopes:       []string{"email"},
    }
}

// GetRandomOAuthStateString will return random string
func GetRandomOAuthStateString() string {
    return "SomeRandomStringAlgorithmForMoreSecurity"
}

// GetUserInfoFromFacebook will return information of user which is fetched from facebook
func GetUserInfoFromFacebook(token string) (FacebookUserDetails, error) {
    var fbUserDetails FacebookUserDetails
    facebookUserDetailsRequest, _ := http.NewRequest("GET", "https://graph.facebook.com/me?fields=id,name,email&access_token="+token, nil)
    facebookUserDetailsResponse, facebookUserDetailsResponseError := http.DefaultClient.Do(facebookUserDetailsRequest)

    if facebookUserDetailsResponseError != nil {
        return FacebookUserDetails{}, errors.New("Error occurred while getting information from Facebook")
    }

    decoder := json.NewDecoder(facebookUserDetailsResponse.Body)
    decoderErr := decoder.Decode(&fbUserDetails)
    defer facebookUserDetailsResponse.Body.Close()

    if decoderErr != nil {
        return FacebookUserDetails{}, errors.New("Error occurred while getting information from Facebook")
    }

    return fbUserDetails, nil
}
Explanation:
GetFacebookOAuthConfig()Will return the OAuth Configuration struct.GetRandomOAuthStateString()function will return some random string.GetUserInfoFromFacebook(), This method will call the Facebook graph API and returns the Email, Name and ID of the user.- This method will expect a token which we get from the Facebook API. Using that token we will call the Graph API and rest of the code just an error handling.
10. Adding GoLang routes and implementing the endpoints
Create aroutes.goin the root of the project, Here we will register application routes. Here we will usegorilla/muxpackage to register routes.
=>ThenAddApproutes()function will register all the routes in the application. Here we have only one route to add which will be used by the FrontEnd javascript.
routes.go:
package main

import (
    "log"

    "github.com/gorilla/mux"
)

// AddApproutes will add the routes for the application
func AddApproutes(route *mux.Router) {

    log.Println("Loadeding Routes...")

    route.HandleFunc("/", RenderHome)

    route.HandleFunc("/profile", RenderProfile)

    route.HandleFunc("/login/facebook", InitFacebookLogin)

    route.HandleFunc("/facebook/callback", HandleFacebookLogin)

    route.HandleFunc("/userDetails", GetUserDetails).Methods("GET")

    log.Println("Routes are Loaded.")
}
Explanation:
- The
/route will render the Home page, from where you can log in to Facebook - The
/profilepage will display the User’s Name and logout Button. /login/facebookroute will initiate the Facebook Login./facebook/callbackroute will handle the Facebook Login callback.- And the name suggests the
/userDetailsroutes will give the user details based on the Authentication token.
Now let’s finish the endpoints by creating the handlers of each respective API. We create three methods as followsInitFacebookLogin(),HandleFacebookLogin()andGetUserDetails(). The name of the above functions are self-explanatory and we will write them inside theroutes-handlers.go.
Now create aroutes-handlers.gofile and write down the below code,
routes-handlers.go:
package main

import (
    "context"
    "encoding/json"
    "errors"
    "net/http"
    "strings"
    "time"

    "go.mongodb.org/mongo-driver/bson"
    "golang.org/x/oauth2"
)

// RenderHome Rendering the Home Page
func RenderHome(response http.ResponseWriter, request *http.Request) {
    http.ServeFile(response, request, "views/index.html")
}

// RenderProfile Rendering the ProfileHome Page
func RenderProfile(response http.ResponseWriter, request *http.Request) {
    http.ServeFile(response, request, "views/profile.html")
}

// InitFacebookLogin function will initiate the Facebook Login
func InitFacebookLogin(response http.ResponseWriter, request *http.Request) {
    var OAuth2Config = GetFacebookOAuthConfig()
    url := OAuth2Config.AuthCodeURL(GetRandomOAuthStateString())
    http.Redirect(response, request, url, http.StatusTemporaryRedirect)
}

// HandleFacebookLogin function will handle the Facebook Login Callback
func HandleFacebookLogin(response http.ResponseWriter, request *http.Request) {
    var state = request.FormValue("state")
    var code = request.FormValue("code")

    if state != GetRandomOAuthStateString() {
        http.Redirect(response, request, "/?invalidlogin=true", http.StatusTemporaryRedirect)
    }

    var OAuth2Config = GetFacebookOAuthConfig()

    token, err := OAuth2Config.Exchange(oauth2.NoContext, code)

    if err != nil || token == nil {
        http.Redirect(response, request, "/?invalidlogin=true", http.StatusTemporaryRedirect)
    }

    fbUserDetails, fbUserDetailsError := GetUserInfoFromFacebook(token.AccessToken)

    if fbUserDetailsError != nil {
        http.Redirect(response, request, "/?invalidlogin=true", http.StatusTemporaryRedirect)
    }

    authToken, authTokenError := SignInUser(fbUserDetails)

    if authTokenError != nil {
        http.Redirect(response, request, "/?invalidlogin=true", http.StatusTemporaryRedirect)
    }

    cookie := &http.Cookie{Name: "Authorization", Value: "Bearer " + authToken, Path: "/"}
    http.SetCookie(response, cookie)

    http.Redirect(response, request, "/profile", http.StatusTemporaryRedirect)
}

// SignInUser Used for Signing In the Users
func SignInUser(facebookUserDetails FacebookUserDetails) (string, error) {
    var result UserDetails

    if facebookUserDetails == (FacebookUserDetails{}) {
        return "", errors.New("User details Can't be empty")
    }

    if facebookUserDetails.Email == "" {
        return "", errors.New("Last Name can't be empty")
    }

    if facebookUserDetails.Name == "" {
        return "", errors.New("Password can't be empty")
    }

    collection := Client.Database("test").Collection("users")
    ctx, cancel := context.WithTimeout(context.Background(), 10*time.Second)

    _ = collection.FindOne(ctx, bson.M{
        "email": facebookUserDetails.Email,
    }).Decode(&result)

    defer cancel()

    if result == (UserDetails{}) {
        _, registrationError := collection.InsertOne(ctx, bson.M{
            "email":    facebookUserDetails.Email,
            "password": "",
            "name":     facebookUserDetails.Name,
        })
        defer cancel()

        if registrationError != nil {
            return "", errors.New("Error occurred registration")
        }
    }

    tokenString, _ := CreateJWT(facebookUserDetails.Email)

    if tokenString == "" {
        return "", errors.New("Unable to generate Auth token")
    }

    return tokenString, nil
}

// GetUserDetails Used for getting the user details using user token
func GetUserDetails(response http.ResponseWriter, request *http.Request) {
    var result UserDetails
    var errorResponse = ErrorResponse{
        Code: http.StatusInternalServerError, Message: "It's not you it's me.",
    }
    bearerToken := request.Header.Get("Authorization")
    var authorizationToken = strings.Split(bearerToken, " ")[1]

    email, _ := VerifyToken(authorizationToken)
    if email == "" {
        returnErrorResponse(response, request, errorResponse)
    } else {
        collection := Client.Database("test").Collection("users")

        ctx, cancel := context.WithTimeout(context.Background(), 10*time.Second)
        var err = collection.FindOne(ctx, bson.M{
            "email": email,
        }).Decode(&result)

        defer cancel()

        if err != nil {
            returnErrorResponse(response, request, errorResponse)
        } else {
            var successResponse = SuccessResponse{
                Code:     http.StatusOK,
                Message:  "You are logged in successfully",
                Response: result.Name,
            }

            successJSONResponse, jsonError := json.Marshal(successResponse)

            if jsonError != nil {
                returnErrorResponse(response, request, errorResponse)
            }
            response.Header().Set("Content-Type", "application/json")
            response.Write(successJSONResponse)
        }
    }
}

func returnErrorResponse(response http.ResponseWriter, request *http.Request, errorMesage ErrorResponse) {
    httpResponse := &ErrorResponse{Code: errorMesage.Code, Message: errorMesage.Message}
    jsonResponse, err := json.Marshal(httpResponse)
    if err != nil {
        panic(err)
    }
    response.Header().Set("Content-Type", "application/json")
    response.WriteHeader(errorMesage.Code)
    response.Write(jsonResponse)
}
Explanation:
- In the above file, we have created
RenderProfileandRenderHomewhich will just render an HTML Page. - The function
InitFacebookLogin(), will initiate the Facebook Login. The functionGetFacebookOAuthConfig()will return theOAuthConfiguration struct. - The
AuthCodeURL()will actually initiate Facebook Login, by passing the Oauth Configuration. HandleFacebookLogin()will handle the Facebook login callback, in this function, first we read state and code from the URL that we get from the Facebook.- Then again we get the Facebook configuration using
GetFacebookOAuthConfig()to fetch the token from Facebook using OAuth package’sOAuth2Config.Exchange()method. - The
OAuth2Config.Exchange()will return the Facebook token using which we can get information of the Facebook Users. - The function
GetUserInfoFromFacebook()will return the users information by making a HTTP request to the Facebook servers. - Once we receive the User details from Facebook servers we call
SignInUser()function by passing these values. TheSignInUser()will make the user log in if that user is registered with us. - If the user is not registered with us then we store the user details in our database, after that we make the user log in.
- Once all the database queries are done then we create JWT token and store that token in Cookie by using
http.SetCookie()method. - After storing the cookie we redirect user the user to
/profile.
Once the user is redirected to the profile page from there we will read the JWT token from cookie using Javascript. After that, we can pass the token to /getUserDetails API which in return gives the user details such as name and email.
11. Running the application
To run the application, you need to build the application and then run the executable file as shown below,
> go build
> ./Facebook_Login_with_GoLang.exe
Now you can test this application by opening the localhost:8000.
12. Conclusion
In this post, We learned how to use and implement the Facebook login system in Golang. Here we combined the Facebook login along with JWT token and stored the user into the MongoDB database. For now, that’s it,
Meanwhile, you can play with code and if something doesn’t work let me know in comments. Feel free to share your opinions in the below comments box and if you like this article do share with your friends and colleagues.